 DOWNLOAD Win
 DOWNLOAD Mac
5 Ways to Screen Record Disney+ [Ultimate Guide in 2026]
 Tessa Kirkland
- 09 February, 2026
- Blog
Disney Plus provides a variety of content that appeals to a wide audience, ranging from vintage Disney animated films to Marvel and Star Wars movies. Many people prefer to save videos so they can watch them permanently, but this is not allowed by Disney+ due to its download limits. Plus, Disney+ removes some videos from time to time. Therefore, some people will choose other methods to save the video on their own device, such as screen record.
But how to? This article develops an ultimate guide to introduce 5 feasible methods to screen record Disney Plus on PC, Mac, Android, and iOS devices, along with their pros and cons and detailed recording steps.
1. Record Disney Plus with DispCam
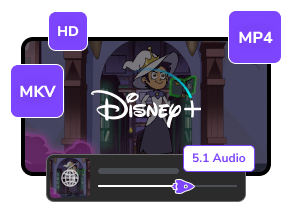
DispCam is ultimately the best solution to screen record Disney Plus on PC. It doesn't have problems like other screen recording tools have, such as not being able to save audio or even having a black screen condition. It is a safe and reliable Disney Plus video downloader that works effectively both on Windows and Mac (Windows 11/10 & macOS 11 - macOS 26).
This specialist tool is designed for saving full HD videos along with their audio and subtitles, without any jams and noises. There are numerous settings options available for you to choose from, like the languages of audio and subtitles, subtitles types, video codecs, and more. Videos downloaded by DispCam are saved in MP4 or MKV output format, which allows for easy transfer to any device for viewing or self-editing. With DispCam, you can quickly download your favorite videos with one click, without having to sit in front of the screen waiting for the video to finish recording.
As you manage your downloaded videos, it’s always wise to be prepared for unexpected data loss. Using a recovery tool like Syncios D-Savior can help you quickly restore your files, ensuring your Disney Plus videos are always there when you need them.
| Who Will Like | Want to record Disney Plus on PC and Mac, download Disney Plus in MP4 |
|---|---|
| Pros |
|
| Cons |
|
How to Screen Record Disney Plus with DispCam?
Step 1Log into Your Disney Plus Account
Download and install the latest version of DispCam on your computer. Launch it and log into your Disney Plus account in the pop-up window.
Step 2Search Disney Plus Movies or Shows
After login, you can search and find the desired content in the built-in browser.
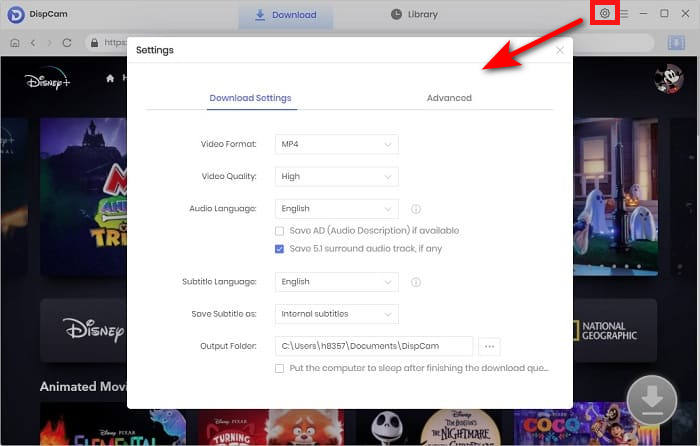
Step 3 Set Quality, Format, Language
Select the video parameters you want to output in the "Settings" window. Here you can choose the video quality (High, Medium, Low), video format (MP4/MKV), audio languages, subtitles languages, subtitles format, and output path. In the "Advanced" tab, if hardware acceleration is available, it can be enabled.
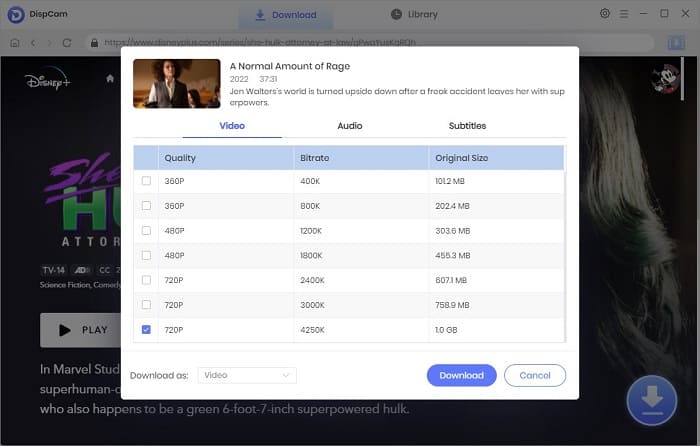
Step 4 Customize Size, Bitrate, Audio Track and More
If you want to make more specific settings for your video, go to the "Advanced Download" window, where you can select the video quality with size and bitrate, audio and subtitles with codec. DispCam also supports downloading video, audio, or subtitles separately.
Step 5 Screen Record Disney Plus Movies
Click the "Download" button and wait for the video to finish recording.
2. Record Disney Plus with OBS
Open Broadcaster Software (OBS) is a powerful open source screen recording software for you to screen record Disney Plus. It is also one of the most used streaming programs on the Internet. Not only does it support recording audio and video, it also allows you to connect to any live streaming or video conferencing platform, as well as live streaming using any digital camera. As such a professional program, it can be downloaded for free for Windows, Mac and Linux on your computer system.
| Who Will Like | Want to record Disney Plus on Windows, Mac, and Linux |
|---|---|
| Pros |
|
| Cons |
|
How to Use OBS to Record Disney Plus?
Step 1 Download and install OBS from its official website https://obsproject.com/download.
Step 2 Add a scene manually by clicking on the "+" icon in the Scenes tab at the bottom left of the interface. Similarly, click on the plus icon under the Sources tab.
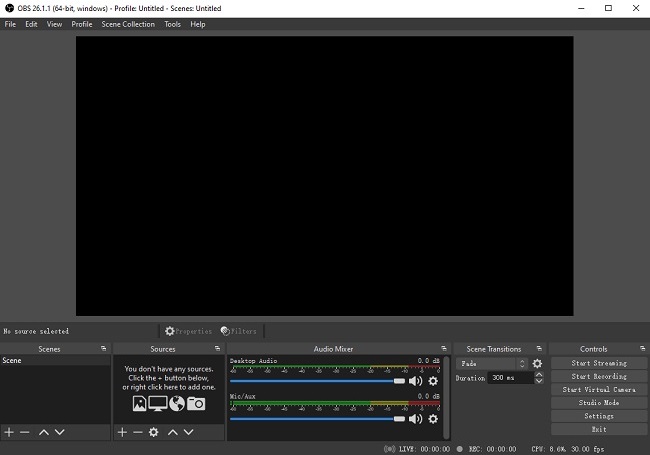
Step 3 Select "Display Capture" from the drop-down list. In the "Create one" window that pops up, name it and click the "OK" button.
Step 4 In the properties window, you can select display method, capture method, and whether to capture the cursor. If you want to change the output path of the file, you can modify it in the Settings tab at the bottom right corner of the screen.
Step 5 Start playing the Disney Plus show you want to record and click the "Start Recording" tab in the bottom right corner.
Step 6 When the recording is complete, click the "Stop Recording" button. The file will be automatically saved to the recording folder you set before.
3. Record Disney Plus with Xbox Game Bar
Xbox Game Bar is also a highly recommended tool to record Disney Plus on PC, as it is built into Windows 10 and 11 with a variety of features for capturing game clips and screenshots. The tool was originally designed for gamers, but can also be used to record Disney Plus content on PC, saving audio and video to your computer that can be used for playback or editing. Note that the Xbox Game Bar can't record the entire screen, and the only way to make sure the video records properly is to play the Disney Plus video through the Firefox browser.
| Who Will Like | Want to record Disney Plus on PC |
|---|---|
| Pros |
|
| Cons |
|
How to Use Xbox Game bar to Record Disney Plus Movies?
Step 1 To open Xbox Game bar, simultaneously hit the Windows key and G on your keyboard. You'll see a series of widgets, such as Capture and Audio. If you don't see it, click the leftmost icon on the menu bar to open the widget window.
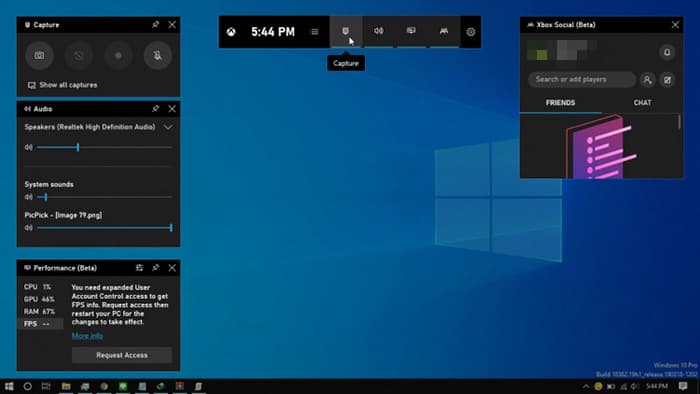
Step 2 Open the Disney Plus video you want to record in Firefox.
Step 3 Click the "Record" button under the Capture widget or press Windows + Alt + R to start recording. A small timer window will be displayed on the desktop.
Step 4 To end the screen recording, simply press the Windows + Alt + R keys again or click the "Stop Recording" icon. You can find your recorded video in the "Video" - "Capture" folder on your computer.
4. Record Disney Plus with QuickTime Player
If you are Mac users looking to screen record Disney Plus, try QuickTime Player. It is a built-in application for macOS and much more than a simple multimedia player. In addition to watching videos, playing music, and viewing pictures, you can also record video, audio, and screen, and do some basic video editing, such as rearranging, adding, deleting, and trimming video clips.
| Who Will Like | Want to record Disney Plus on Mac |
|---|---|
| Pros |
|
| Cons |
|
How to Record Disney Plus on Mac with QuickTime Player?
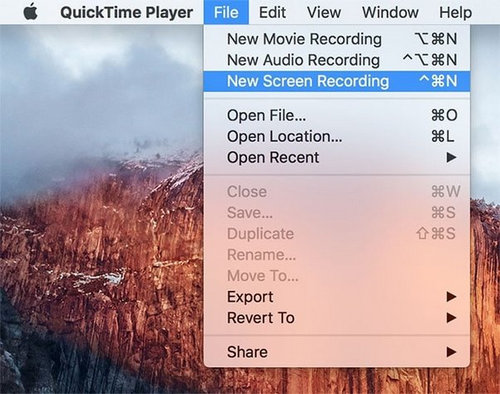
Step 1 Open the QuickTime Player app on your Mac. Click on the "File" tab and select "New Movie Recording" option from the drop-down list.
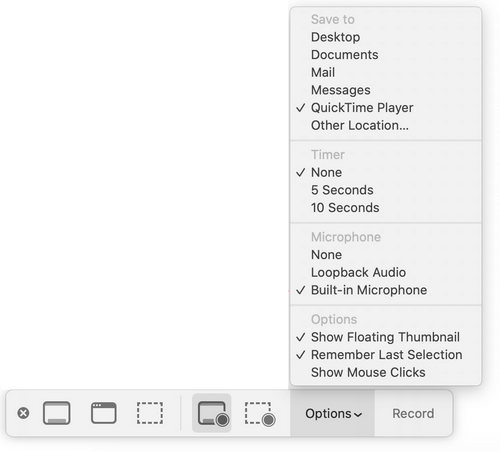
Step 2 A "Screen Recording" window will appear. Click the "arrow" icon beside the "Record" button to choose the settings of recording based on your needs, like the camera, microphone, and quality. Swiping the volume control symbol also changes the volume level of what is being recorded.
Step 3 Find the video you want to record from Disney Plus.
Step 4 Tap on the "Record" button and you will be asked to select and drag over the area you want to record. The Disney Plus recording will automatically begin.
Step 5 When done, click the "Stop" button on the toolbar, a circle with a square pattern in it. Your computer will automatically play back the video you just recorded. You can trim the video or save it directly on your computer if you have no problems by choosing "File" > "Save".
5. Record Disney Plus with PlayOn
PlayOn is the go-to option to record Disney Plus on Android or iPhone. Because it is a streaming video recorder with two different programs that work on mobile and PC: PlayOn Home for Windows and PlayOn Cloud for iPhone, Android and other mobile devices. It supports recording videos and movies from more than 20 sites, including Disney+, Netflix, Paramount+, Peacock, and more. It automatically skips advertisements during the recording process, ensuring that you are not disturbed by advertisements.
The differences between the PC and mobile versions are mainly reflected in the resolution of the recording and the price. The computer version costs just $4.99 per month for unlimited recording, but only supports recording up to 720p video. While the mobile device version supports up to 1080p video recording, it costs 3 points to record 1080p video and 1 point for 720p. (You'll need to spend $4.99 a month to get the 30 credits, and $10 if you want to buy additional ones.)
| Who Will Like | Want to record Disney Plus on iOS, Android, and PC |
|---|---|
| Pros |
|
| Cons |
|
How to Use PlayOn to Record Disney Plus on Android or iPhone?
Step 1 Download and install the app and launch it on your mobile device/PC.
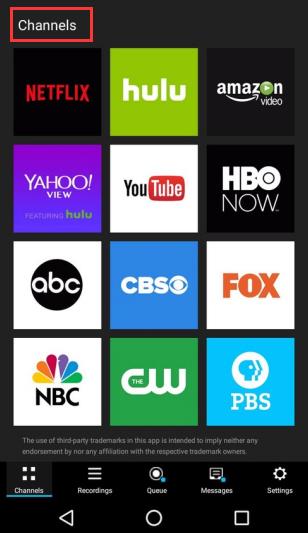
Step 2 Click on the "Channels" tab and choose Disney Plus.
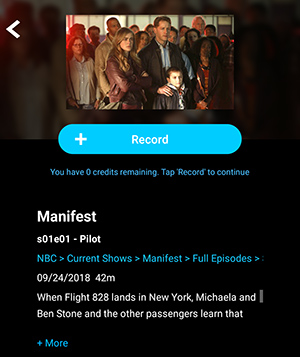
Step 3 Find the video or movie you want to record and then click on the blue "Record" button. PlayOn will record your selected video in the background. Once the recording is complete, the video will be saved in MP4 format on your cloud.
Step 4 For PlayOn Home users, the video will directly saved on your computer. For PlayOn Cloud users, you need to manually download the video in the "Recording" to save it on your device or turn on the automatic download function.
FAQ About Recording Disney Plus
1. Can I screen record Disney Plus?
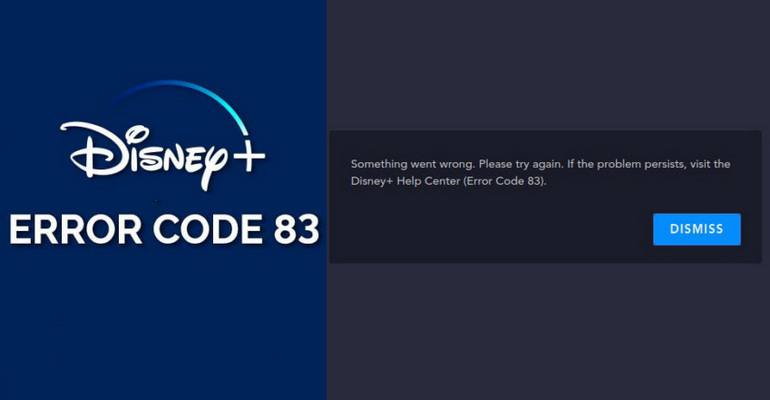
Disney Plus takes strict measures to protect its content against piracy and copying. Therefore, recording Disney Plus is not permitted and is illegal. Disney Plus content is copyrighted and encrypted through digital rights management, so that's why some users may find that they can't find the downloaded video file on their mobile device - it's because Disney Plus stores the video in an encrypted format on your device.
2. Can Disney Plus detect when I'm recording?
Generally, Disney Plus can detect that you are doing screen recording. This explains why users frequently complain about seeing black or blank screens when using OBS, Xbox Game Bar, or QuickTime Player to screen record Disney Plus. However, there are still practical ways to accomplish this, such as the aforementioned use of third-party software like DispCam or PlayOn.
Conclusion: What is the Best Tool for Screen Recording Disney+?
Each of these five programs has its own advantages and disadvantages. In terms of overall features, compatibility, DispCam is definitely the best choice. While there are free tools above for recording Disney Plus on PC and Mac, most of the time you'll likely encounter a recording failure. DispCam does well in terms of value for money, and it also offers a free trial, allowing you to download the first five minutes of the video. It's worth a shot! Download it and have a try.
Tessa Kirkland | Senior Writer